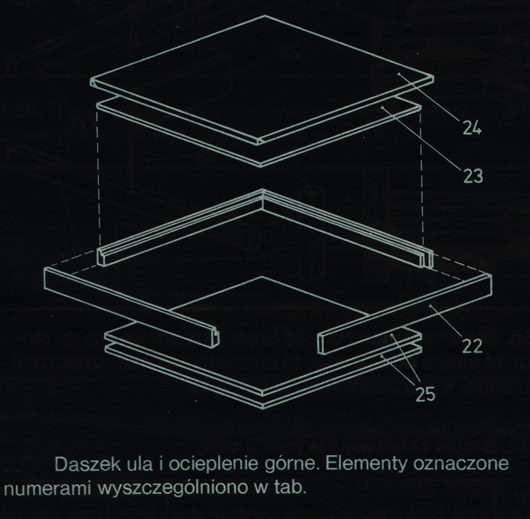
Roof and top insulation of the hive.
The roof telescopically overlaps the nest part of the hive or the extension. Tolerance is approx. 2 mm. Covering the canopy with a sheet is necessary when using itinerant economy, as other materials can quickly deteriorate when stacking hives on top of each other. Two insulation plates 25 they secure, together with the roof plate, the hive from the top against overheating in very hot weather and sufficiently protect the nest against low temperatures in winter.
Performance Notes (collected according to points consistent with the numbers of the canopy elements specified in tab.
 and in fig
 22. For the battens, choose pine boards without knots. Transverse rebate 17 x 8,5 is only performed at one end of each batten, on the same side as the longitudinal rebate 8,5 x 12. However, it should be noted, that the height of the longitudinal rebate depends on the thickness of the soft fibreboard. Due to the necessity to change the structure of the canopy, it is not recommended to use boards thicker than 14 mm.
23. This plate should be cut very carefully - it will make it much easier to make the roof at right angles.
The order of assembly of elements. First, the brim frame is knocked together, additionally lubricating the adjacent edges with waterproof glue or enamel, so that the frame is a square 515 x 515, and the longitudinal ribs gave a slot for the roof plate 23. After nailing the top plate, the outer corners of the frame are rounded (rounding radius approx. 4). At this stage, the visor frame is primed and painted with paint.
Sheet metal bends (preferably galvanized thickness 0.4…0,6) it is most convenient to perform on a roof that is dry after painting. The plate is placed in the corner of the table and the inverted roof is placed on it. The edges of the sheet should protrude uniformly on all sides of the roof. When they are in this arrangement, the roof with the sheet is attached to the table with a thick strip, on the frame, and a carpentry crush. Then the edges of the sheet are bent to the sides of the roof, starting from the inside, towards the ends. It is advisable to bend it slightly (collapse) the sheet in the corners to the inside. At the point where both edges meet, press the sheet metal together with pliers, as far as the corner of the canopy frame, and bend the resulting plate corner. Before the metal sheet is finally nailed to the canopy frame, it is advisable to fasten it, e.g. two nails, to each side of the frame before loosening the clamping clamp. The nails for nailing the sheet should be quite thick, so that you can easily pierce the sheet metal with them. Earlier making small holes for nails with a sharp tool significantly facilitates nailing. The sheet metal formed and nailed in this way creates a slightly convex surface on the outside, which facilitates water drainage.
The edges of the upper thermal insulation board 25 after cutting, lightly sand with sandpaper.


