The nest of the hive.
During use, the nest is subject to frequent dampness and drying, therefore the wood used for its construction should have an intermediate moisture content. Such selection of wood will minimize its swelling and shrinkage in changing humidity conditions. In practice, this is achieved by properly seasoning the wood and making the hive elements in the fall, winter and spring from air-dry lumber.
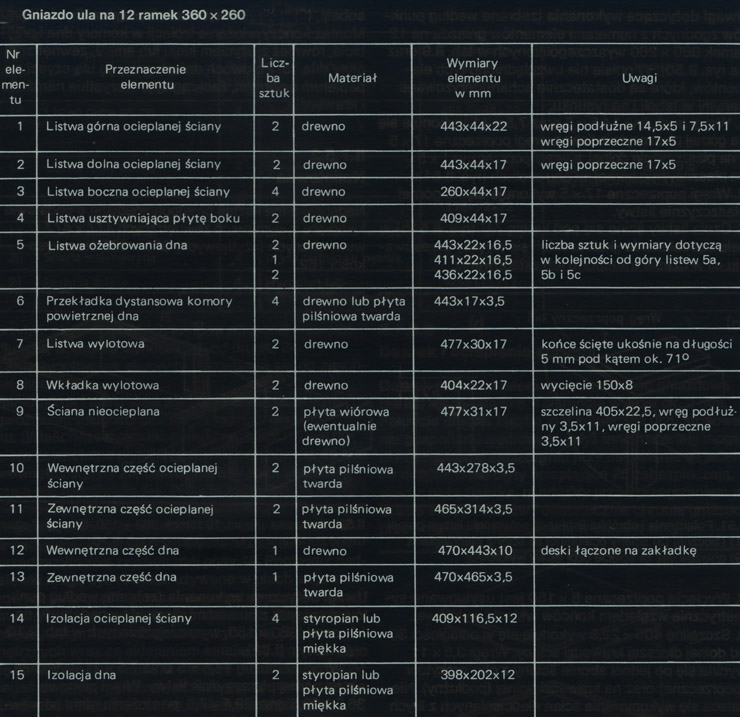
Performance Notes (collected by points consistent with the numbers of the elements of the slot na 12 frames 360 x 260 listed in the table
and in the drawing
These elements were not included in the description, which are sufficiently characterized by the data in the table and in the drawing.
1. Oblong ribs 14,5 x 5 and 7,5 x 11 is performed on the upper plane of the slat; transverse frames 17×5
– on the lower plane, a transverse frames 1×5-
on the upper plane on both faces.
2. Transverse frames 17×5 is performed on the upper plane of the slat.
7. The front of the board is cut at an angle of 71 ° in order to prevent it from being "injured" when the hives are moved during transport or storage. 8. Transverse cutout 8 x 150 it is symmetrical to the ends of the outlet insert.
9. The rift 405 x 22,5 is performed at a distance 30 from the bottom long edge of the wall. Frames 3,5 x 11 is cut on one side of the wall from both gables (transverse) and on the lower edge (longitudinal). It is not recommended to make non-insulated walls from solid boards.
The order of assembly of elements. First, the frames of insulated walls are assembled from elements 1, 2 i 3. In the upper part (joining the slats 1 i 3) nails are hammered from the side, i.e.. through the slat 3. In the lower part, you can break the frame as you like, even from below and from the side. Inner plate 10, cut while maintaining dimensions and right angles, facilitates accurate assembly of the frame. After nailing the internal boards to both frames, both uninsulated walls are nailed to the tops of the frames 9. For nailing non-insulated walls, use nails with a length of approx. 45. Nails after passing through the strip 3 it bends from the inside.
Then, before starting to nail the bottom, check whether the already compacted walls are mutually perpendicular. if so, the planks of the inner bottom plane are nailed in turn 12, starting with one of the peaks. By carefully making all the walls and tapping them together with right angles, the bottom planks will line up with the inside surface to the lower edge of the outlet openings. After nailing the boards, the battens are nailed to the bottom (5 a, b i c) bottom ribs.
After inserting the insulation 14 external boards are nailed to the sides of the hive 11, by lubricating the previously contacting surfaces with glue or, better, with oil enamel. The assembly is completed by inserting the insulation into the bottom chambers and nailing, also with the use of glue or enamel, outer bottom plate 13. After two days, the hive's nest is cleaned with sandpaper, rounding all corners and edges.
 and in the drawing
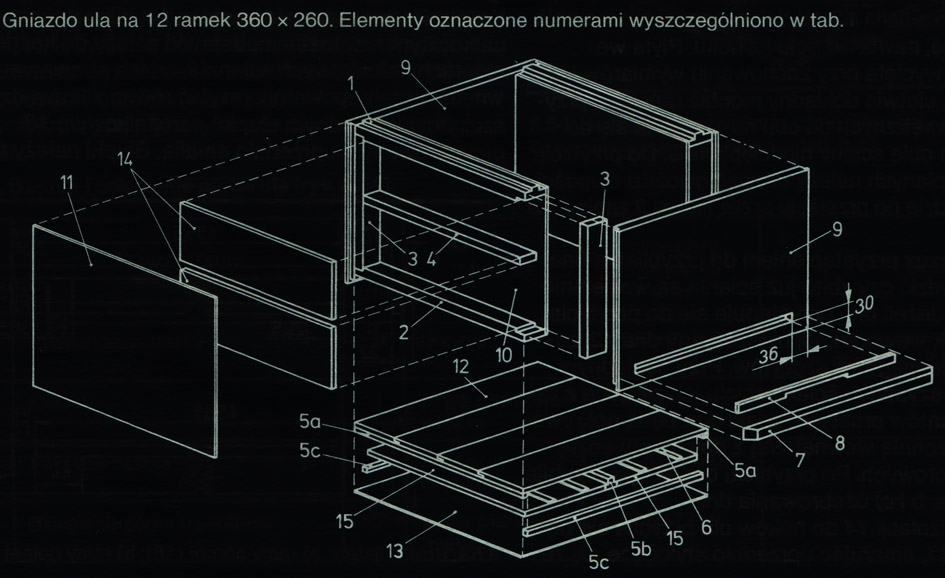 These elements were not included in the description, which are sufficiently characterized by the data in the table and in the drawing.
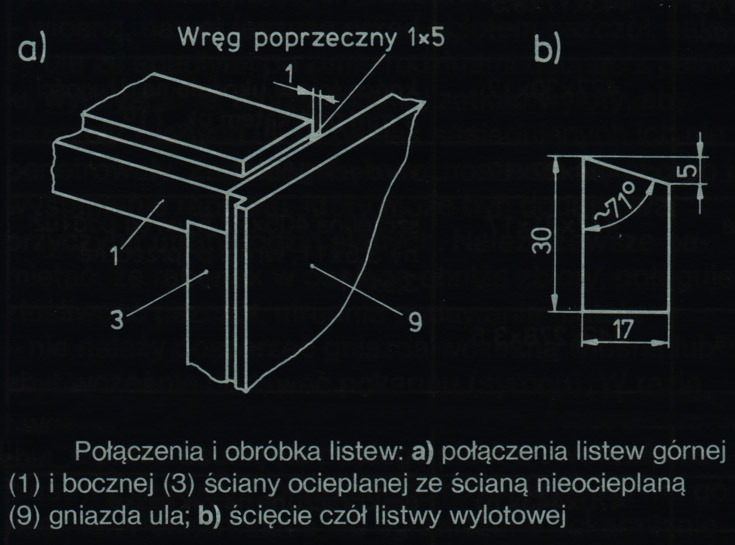 8. Transverse cutout 8 x 150 it is symmetrical to the ends of the outlet insert.


